- Photo Safaris
- Alaska Bears & Puffins World's best Alaskan Coastal Brown Bear photo experience. Small group size, idyllic location, deluxe lodging, and Puffins!
- Participant Guestbook & Testimonials Candid Feedback from our participants over the years from our photo safaris, tours and workshops. We don't think there is any better way to evaluate a possible trip or workshop than to find out what others thought.
- Custom Photo Tours, Safaris and Personal Instruction Over the years we've found that many of our clients & friends want to participate in one of our trips but the dates we've scheduled just don't work for them or they'd like a customized trip for their family or friends.
- Myanmar (Burma) Photo Tour Myanmar (Burma) Photo Tour December 2017 -- with Angkor Wat option
- Reviews Go hands-on
- Camera Reviews Hands-on with our favorite cameras
- Lens reviews Lenses tested
- Photo Accessories Reviews Reviews of useful Photo and Camera Accessories of interest to our readers
- Useful Tools & Gadgets Handy tools and gadgets we've found useful or essential in our work and want to share with you.
- What's In My Camera Bag The gear David Cardinal shoots with in the field and recommends, including bags and tools, and why
- Articles About photography
- Getting Started Some photography basics
- Travel photography lesson 1: Learning your camera Top skills you should learn before heading off on a trip
- Choosing a Colorspace Picking the right colorspace is essential for a proper workflow. We walk you through your options.
- Understanding Dynamic Range Understanding Dynamic Range
- Landscape Photography Tips from Yosemite Landscape Photography, It's All About Contrast
- Introduction to Shooting Raw Introduction to Raw Files and Raw Conversion by Dave Ryan
- Using Curves by Mike Russell Using Curves
- Copyright Registration Made Easy Copyright Registration Made Easy
- Guide to Image Resizing A Photographers' Guide to Image Resizing
- CCD Cleaning by Moose Peterson CCD Cleaning by Moose Peterson
- Profiling Your Printer Profiling Your Printer
- White Balance by Moose Peterson White Balance -- Are You RGB Savvy by Moose Peterson
- Photo Tips and Techniques Quick tips and pro tricks and techniques to rapidly improve your photography
- News Photo industry and related news and reviews from around the Internet, including from dpreview and CNET
- Getting Started Some photography basics
- Resources On the web
- My Camera Bag--What I Shoot With and Why The photo gear, travel equipment, clothing, bags and accessories that I shoot with and use and why.
- Datacolor Experts Blog Color gurus, including our own David Cardinal
- Amazon Affiliate Purchases made through this link help support our site and cost you absolutely nothing. Give it a try!
- Forums User to user
- Think Tank Photo Bags Intelligently designed photo bags that I love & rely on!
- Rent Lenses & Cameras Borrowlenses does a great job of providing timely services at a great price.
- Travel Insurance With the high cost of trips and possibility of medical issues abroad trip insurance is a must for peace of mind for overseas trips in particular.
- Moose Peterson's Site There isn't much that Moose doesn't know about nature and wildlife photography. You can't learn from anyone better.
- Journeys Unforgettable Africa Journeys Unforgettable -- Awesome African safari organizers. Let them know we sent you!
- Agoda International discounted hotel booking through Agoda
- Cardinal Photo Products on Zazzle A fun selection of great gift products made from a few of our favorite images.
- David Tobie's Gallery Innovative & creative art from the guy who knows more about color than nearly anyone else
- Galleries Our favorite images
DPS 6-11: The Magic of High Dynamic Range Imagery, Nikon D3X Intro & Lower Prices for the D700 and D3
We hope you all had a great Thanksgiving Day weekend. For most businesses this quarter has been challenging and we can expect more tricky times in 2009. So the holidays are a great time to take a break and relax, hopefully with your friends and family. In that spirit we've got a great feature article for you on a really fun photo technique that has just gotten much easier--High Dynamic Range (or HDR) photography. And as always we have an update on our 2009 safaris, a recap of recent hot new photo products and news from around the photo industry including the exciting introduction of the Nikon D3X and price drops on the popular Nikon D3 and Nikon D700.
Feature Photo Article:
The Magic of HDR Photography
Perhaps the first thing you noticed when you first took a photograph is that your camera couldn't capture what your eye could see. That's true for color but it is even more true for dynamic range. Dynamic range is simply the ratio between the brightest part of a scene and the darkest part. An outdoor scene with bright sunlight and dark shade can easily have a dynamic range of thousands to one. Compare that to a current model SLR that can only realistically create detail in a single capture in a ratio of a few hundred to one. [You'll see much higher specs listed, but those go from dead black to complete white and don't reflect the range that can actually contain viewable content]
Short of waiting around for another revolution in digital camera technology the only practical solution is to capture multiple images of the same scene with different exposures and combine them into a single image which can use the properly exposed portions of each image to create a single "high dynamic range" image. This technique is called HDR photography. Many of us have written about the brute force way of doing HDR. You create two or three images of a scene, one exposed for the highlights, one for the shadows, and optionally one for the mid-tones. Then you painstakingly use layer masks in Photoshop to create a composite image with the correct exposures of all the pieces of the image shown through to the final version. For more on that method you can read the story I wrote for nikondigital.org. That technique is pretty quick if you have a simple image structure--like a horizon or shadow line--where the masking is a fairly quick process. On the other hand if you have very complex images like the Redwood Trees we show below with dozens of areas of backlight showing through the masking would be very difficult and we need to look for new tools.
Fortunately for everyone laboring to recreate the world around them in its full glory recent developments in software have made HDR photography much quicker and more importantly more effective. First, Photoshop now supports three commands which are all very useful in creating HDR images: Auto-Align, Auto-Blend and Merge to HDR.
Auto-Align helps with a very straightforward issue which can occur when you take multiple images of the same scene. It looks at the images and will try to shift them around so they line up perfectly. Obviously without perfect alignment of your initial images your final image won't look natural when you create it. Even if you use a tripod your images can still be off by a few pixels and Auto-align can help fix that with a single click.
Auto-Blend is a powerful tool that is usually promoted for stiching overlapping images together. But it turns out it is a very powerful tool for automatically combining multiple images with different exposures of the same subject. Coincidentally it works best for the complicated images like the Redwoods that are most difficult to do with layers--and frankly it doesn't work very well for segmented images like the Half Dome image we used in the original article. The following example shows two images of a redwood forest merged using Auto-Blend.
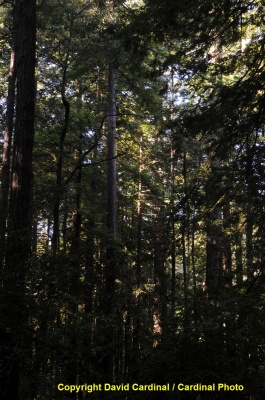 Trees at -2 Exposure Comp | 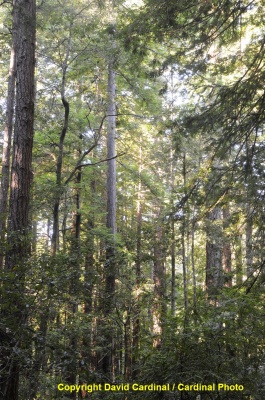 Trees with 0 Exposure Comp |  Blending with CS4's Auto-Blend |
Photoshops new Merge to HDR command (File->Automate->Merge to HDR...) is designed to help us with this problem. It lets you combine multiple differently exposed images of the same scene into a single HDR image. In principle this is pretty cool. You can take a few exposures and voila you've got an image that looks just like the one your eye saw. Except for one really big problem--neither your monitor nor your printer can display it. Paper can hold about 100:1 contrast and your monitor only about as much as your camera. So now what? You need to massage the tones in your image to fit into the contrast you can hold on your monitor and on your paper.
Unfortunately that's where Merge to HDR leaves us pretty high and dry. It offers a couple simple tools for changing the tone curve of the combined image, but essentially it only tweaks the Gamma (contrast and where the mid-tones are) but doesn't allow us any artistic control over the image or any real flexibility. So are we stuck going back to the old layer mask method?
HDR Magic: PhotoMatix Pro from HDRSoft
Fortunately not any more. HDR Software offers a very cool application--Photomatix Pro--which is the cat's meow for merging multiple images into an HDR image. Of course it does the basic functionality of Auto-Alignment and Merge to HDR, but it goes way beyond that and the simple tone mapping of Photoshop to provide a much more sophisticated method of doing the tone mapping, called Detail Enhancement.
It can be a little confusing sorting through all the various options for PhotoMatix, as there is both a plug-in version and a stand-alone version and the stand-alone version offers both a more traditional Tone Mapping mode and the very clever Detail Enhancement mode. So I'm going to give you the quick path to what I've found is the most effective starting point for using the tool.
First start with your Raw files. For all the cameras I tried (Nikon D3, D300, D2X, D2H) Photomatix was quite capable of opening the images directly and applying a white balance of your choice with noise reduction. I simply drag my images from my image browser (I use DigitalPro, but any of them should work) onto Photomatix Pro--or you can browse for them. Select the Generate HDR image option. You'll get to pick your White Balance option as well as set some other raw processing options. I recommend leaving the Noise Reduction and Reduce Chromatic Aberration options turned on, as well as the Align images option--just in case your images aren't pixel for pixel aligned. You can choose remove ghosting if there are portions of your image that are in motion. You get to choose the color primaries for your image as well. Pro Photo is the most powerful and flexible, but Adobe RGB is the simplest for most Photoshop workflows. sRGB is fine if your image is only going to relatively low-end output devices. If you need your images to be the precise size of your original even after alignment then choose the "Don't Crop" option.
Next the HDR image will open up. Don't be frightened by how awful it looks. If you had a futuristic HDR display it would actually look just about right. But instead you're looking at it on an actual monitor and video card that can't display the full range so it is sort of a high contrast mud. You need to perform the magic using the Tone Mapping functionality. Simply press the Tone Mapping button and use the Details Enhancer Tab option (The Tone Compressor is more like the feature built-in to Photoshop and the Photomatix plug-in and while it might be useful for certain scientific or architectural applications I haven't ever found it the right way to start off on one of my landscapes or temple images).
Once you are in the Details Enhancement tab there is a bewildering array of sliders, some of which have sort of confusing names. The best news is that the default settings are a pretty good start.
The White Point and Black Point settings work the same way as in Photoshop except they are labeled differently. They're important to the rendering of your highlight and shadows (if you're seeing too many specular highlights for example, try increasing the white point).
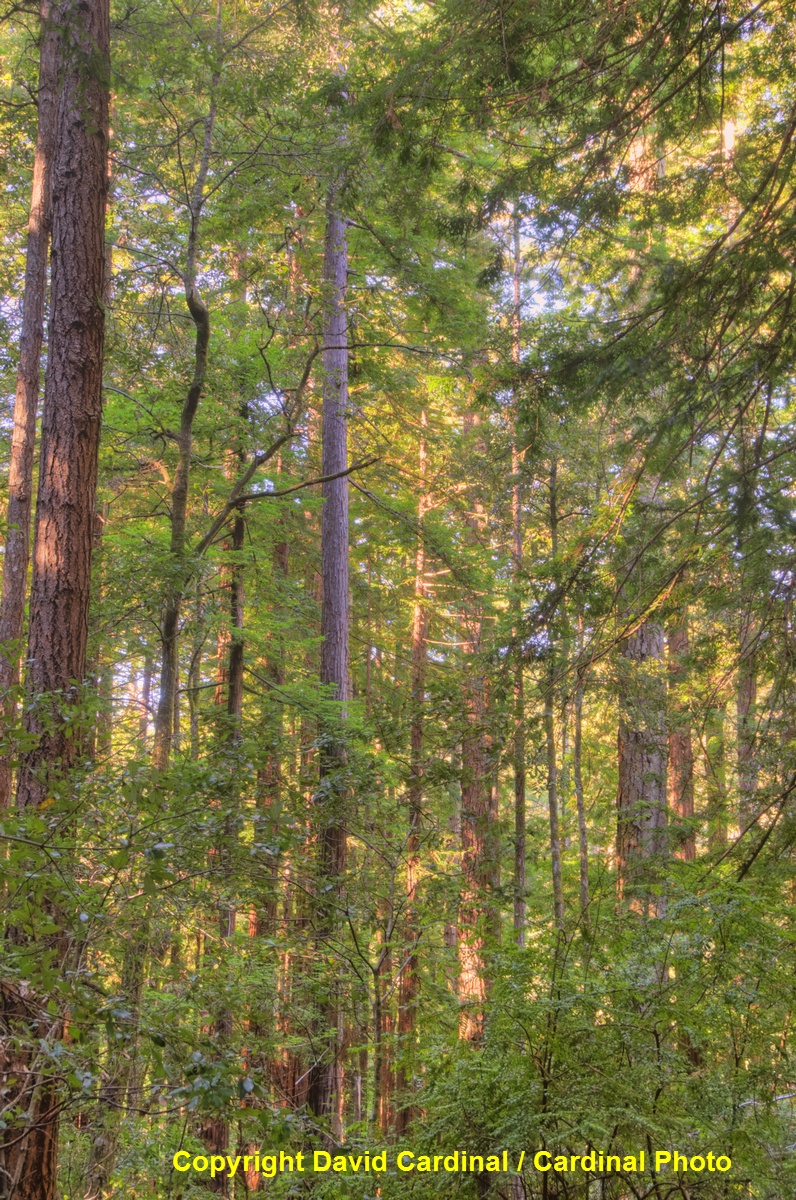
Our image merged using the Detail Enhancement feature of Photomatix Pro
Other Photomatix Tone Mapping settings include:
| Strength: Strength of the contrast enhancement | |
| Color Saturation | |
| Controls the saturation of the RGB color channels. The greater the saturation, the more intense the color. A value of 0 produces a grayscale image. The value acolor channel equally. The default value is 46. | |
| Light Smoothing | |
| Controls smoothing of the contrast variations throughout the image. This setting has an important influence on the look of the tone mapped image. High values give a more "natural" look, low values a more "artificial" or "painterly" look. The default value is "High". | |
| Luminosity | |
| Controls the compression of the tonal range, which has the effect of adjusting the global luminosity level. Moving the slider to the right boosts shadow details and brightens the image. Moving it to the left has the opposite effect, and gives a more "natural" look to the resulting image. The default value is 0. | |
| Microcontrast | |
| Sets the level of accentuation of local details. The default value is 0. | |
| Gamma: Just like in Photoshop, adjusts the contrast curve | |
| Color Temperature You can add warming or cooling using this slider | |
| Saturation Highlights, Saturation Shadows do what you'd expect | |
| Adjusts the color saturation of the highlights relative to the color saturation set with the Color Saturation slider. Values higher than 0 increase the color saturation in the highlights; values lower than 0 decrease it. The default value is 0. | |
| Micro-smoothing smooths out local detail--can be useful for reducing the noise in skies | |
| Highlights Smoothing, Shadows Smoothing do what you'd expect | |
| Shadows Clipping will in effect crush dark noise by pushing some shadow areas to pure black |
There is fairly good online help for the various tools and sliders but there is no "silver bullet" for the right way to process an image. Even the HDR Soft folks recommend experimenting with different approaches to each image as you process it and picking the one you like best. They suggest using the built-in Batch Process function to do that, which is something I plan to experiment with in the future.
Converting Raw files yourself for best Results
For the very best quality results HDRSoft recommends using your favorite Raw converter to turn your Raw images into TIFFs before merging them into an HDR image. This has a couple advantages. First and foremost you can use your choice of converter which will give you the most options and the best quality. Second, you can use different white balance settings for each image if you have a scene with dramatically mixed lighting (a partially shaded sunset like the Merced River and Half Dome shot is a classic case since there is warm sunset light on the mountain and very cool shade on the river). Remember though that mixed light scenes will still be very tricky because it will be hard for either your or PhotoMatix to blend them. Note that when you use your own Raw converter you want to set the Exposure and related controls to "0" and let PhotoMatix create the HDR image. If you turn on Auto-Exposure or exposure adjustments you'll mess up the HDR process.
Missing your old fashioned Layers approach to HDR? Then simply process your images into TIFFs and use the Blend Exposure mode of Photomatix Pro to create your initial blended image. It mimics what you used to do by hand, but it does it automatically. You will have to work with a curves layer after you get the image into Photoshop though.
For more great tips on using Photomatix Pro, they have an extensive Q&A on their site.
You've probably noticed I've become a big fan of the new nik Color Efex 3.0 filters. Many of them provide the same functionality I did with laborious use of Actions and hand-tweaked filters before but they do it quickly and simply. And some of the filters like the Glamour Glow are novel treatments that are new tools I've been able to add to my arsenal. B&H has the Color Efex Pro 3.0 filters for sale for $249.
A few more HDR examples:
 Redwood Grove in Butano State Park Pescadero, California |  Half Dome and the Merced River in Yosemite National Park |  Interior & Exterior of Preah Khan Temple in Cambodia near Angkor Wat |
Cardinal Photo Safari Update
The best news for the many of you who have been asking is that we'll be returning to Africa in November, 2009 for another Botswana Wildlife Photo Safari. The Botswana trip is already half full, so if you want to join us now is the time to act! As those of you who have been with us before know, there is nowhere else in the world that compares to a small group specialized photo safari to the private concessions in Botswana. Not only is the wildlife abundant, but the camps are gorgeous. Most importantly there are strict limits on the number of people and vehicles in each concession--and for our photo safaris, a strict limit on the number of people per vehicle. Many days we may not see anyone except the handful of people from our group.The year 2009 will mark my 7th photo safari to the concessions in Botswana. Every trip we've seen not just plenty of lions, hippos, giraffes and antelopes but also cheetahs, leopards and wild dogs. Truly a special trip.
David's Favorite New Products
Nikon SD9 Flash Battery Pack for the Nikon SB-900
I just got my Nikon SD9 (the newly redesigned flash battery pack to go with the SB-900) and it's pretty slick.
Updates from the SD-8a:
- Can take 4 or 8 batteries for extended shooting sessions
- Ready lights for each set of batteries
- Only a single connector to the flash. The capacitor connector (least reliable part of the SD-8a) is gone
- An odd little connector to optionally attach the unit to your camera. A good idea but I wish it was more integrated as I'm sure I'll lose it.
The new case has a velcro flap for the cable which is a nice touch, although I wish the belt loop design was more suited for a carabeener--since I normally hang mine off my tripod if it isn't in a pocket. One of the most interesting recent developments is that lab work (and now Nikon's own manual) have shown that the new "Eneloop" style long-charge-life AA NiMH (also called Imedion) hold more flashes and recycle more quickly than either Lithium AA batteries or traditional NiMH--even though they have much lower rated capacities. This turns out to be due to their low internal capacitance, but for one I'm stocking up on Imedion AAs for my SB-900 and SD9. I'm looking forward to trying it out. If you've got one let us know what you think!
The bad news is the new price of $200, nearly double the SD-8a. You can buy it now at B&H.
Recent Photography News from nikondigital.org
Including the Nikon D3X, and Lower Prices on the D700 & D3
November 30 / December 1: Nikon D3X announced. Essentially a 24.5MP 5fps version of the D3, the camera is positioned to go head to head with medium format cameras. But the resolution comes with some costs--a lower 5fps (7fps in crop mode shooting 7MP), less low light sensitivity (100-1600 + ISO step ups to 6400, so sounds like 1-2 stops less) and higher cost. The new camera is priced at 900,000 yen in Japan and $8000 in the US. The other good news is that the price on the D3 has dropped below $4200 at B&H (it shows as $4999 but once you click on it you'll see the new price).
November 30: Lower prices on Nikon D700--now $2496 at B&H. The Nikon D300 is holding fairly steady at $1485 at B&H.
November 29: FREE High Speed Compact Flash Cards! Seriously: If you order 3 Sandisk Extreme III 4GB cards for $20 each from B&H you qualify for a $60 rebate, making the net cost $0! Or get 3 8GB cards for $30 each and a $70 rebate for a $1/GB net cost. If this is any sign of the pre-Christmas deals it should be a good one for photogrpahers. Thanks to reader Mike Ouye for finding this deal.
November 26: Adobe Releases Camera Raw 5.2 for Photoshop CS4. Adds support for Canon EOS 5D Mark II, Canon Powershot G10 and Panasonic G1, FX150, FZ28, LX3. You can get it easily from the Help->Updates menu in Photoshop. New features: ï‚·
- Targeted Adjustment Tool for on image adjustments
- Output sharpening for print or screen output
- Snapshots for saving all settings in a single reference
- Camera Profiles for enhanced raw file interpretation now available in the Calibration panel
November 26: National Geographic Announces International Photo Competition Winners. You can see them online.
November 21: Digital Railroad shutdown winds sloppily to an end. All images on their servers have been destroyed, no money will be refunded, and any royalties paid to DRR will not be forwarded to photographers (they've gone to the lenders). The only silver lining is that any licenses collected in the next month will be split 70% with the photographer. We'll hope for eveyone's sake that no one lost any irreplaceable images or large chunks of income.
November 19: Nikon releases firmware 5.02 for the SB-900--This has got to be another milestone for the industry. User-upgradeable firmware for a speedlight! You can download it from Nikon. The update addresses two issues:
- With uninterrupted shooting with the SB-900 set to i-TTL mode, images captured just before the flash ceased firing were sometimes overexposed.
- When the SB-900, set to TTL auto flash mode, is used with a camera not supporting the Nikon Creative Lighting System (CLS), flash mode automatically changes to A mode as needed. Now it is restored to the original mode when used with a CLS camera again.
November 17: RED introduced its long awaited hybrid Video/Still camera late last week. If money is no object (and I really mean no object!) and you are shooting in a studio or don't mind walking around with something that looks more like a movie camera than a D-SLRs these are the cat's meow!
November 12: In a disappointing ending for revolutionary camera and sensor maker Foveon, Sigma has purchased the company for an un-disclosed amount. Their radical "three-layer" sensor design never caught on with any of the major camera makers so it is not surprising they have been purchased by their largest customer and partner.
November 11: DPS 6-10: Making the Ordinary Extrarodinary, DigitalPro 5 Announcement and New Product Reviews is now online.
November 11: Digital Railroad servers to be wiped clean & auctioned. Read the depressing current news. SAA still working to get photographers paid.
- Log in to post comments

Latest posts
-
Tue, Jun 14 2022
-
Fri, Jul 9 2021
-
Mon, Mar 1 2021
-
Tue, Mar 3 2020
-
Wed, Jan 15 2020
-
Mon, Nov 11 2019