- Photo Safaris
- Alaska Bears & Puffins World's best Alaskan Coastal Brown Bear photo experience. Small group size, idyllic location, deluxe lodging, and Puffins!
- Participant Guestbook & Testimonials Candid Feedback from our participants over the years from our photo safaris, tours and workshops. We don't think there is any better way to evaluate a possible trip or workshop than to find out what others thought.
- Custom Photo Tours, Safaris and Personal Instruction Over the years we've found that many of our clients & friends want to participate in one of our trips but the dates we've scheduled just don't work for them or they'd like a customized trip for their family or friends.
- Myanmar (Burma) Photo Tour Myanmar (Burma) Photo Tour December 2017 -- with Angkor Wat option
- Reviews Go hands-on
- Camera Reviews Hands-on with our favorite cameras
- Lens reviews Lenses tested
- Photo Accessories Reviews Reviews of useful Photo and Camera Accessories of interest to our readers
- Useful Tools & Gadgets Handy tools and gadgets we've found useful or essential in our work and want to share with you.
- What's In My Camera Bag The gear David Cardinal shoots with in the field and recommends, including bags and tools, and why
- Articles About photography
- Getting Started Some photography basics
- Travel photography lesson 1: Learning your camera Top skills you should learn before heading off on a trip
- Choosing a Colorspace Picking the right colorspace is essential for a proper workflow. We walk you through your options.
- Understanding Dynamic Range Understanding Dynamic Range
- Landscape Photography Tips from Yosemite Landscape Photography, It's All About Contrast
- Introduction to Shooting Raw Introduction to Raw Files and Raw Conversion by Dave Ryan
- Using Curves by Mike Russell Using Curves
- Copyright Registration Made Easy Copyright Registration Made Easy
- Guide to Image Resizing A Photographers' Guide to Image Resizing
- CCD Cleaning by Moose Peterson CCD Cleaning by Moose Peterson
- Profiling Your Printer Profiling Your Printer
- White Balance by Moose Peterson White Balance -- Are You RGB Savvy by Moose Peterson
- Photo Tips and Techniques Quick tips and pro tricks and techniques to rapidly improve your photography
- News Photo industry and related news and reviews from around the Internet, including from dpreview and CNET
- Getting Started Some photography basics
- Resources On the web
- My Camera Bag--What I Shoot With and Why The photo gear, travel equipment, clothing, bags and accessories that I shoot with and use and why.
- Datacolor Experts Blog Color gurus, including our own David Cardinal
- Amazon Affiliate Purchases made through this link help support our site and cost you absolutely nothing. Give it a try!
- Forums User to user
- Think Tank Photo Bags Intelligently designed photo bags that I love & rely on!
- Rent Lenses & Cameras Borrowlenses does a great job of providing timely services at a great price.
- Travel Insurance With the high cost of trips and possibility of medical issues abroad trip insurance is a must for peace of mind for overseas trips in particular.
- Moose Peterson's Site There isn't much that Moose doesn't know about nature and wildlife photography. You can't learn from anyone better.
- Journeys Unforgettable Africa Journeys Unforgettable -- Awesome African safari organizers. Let them know we sent you!
- Agoda International discounted hotel booking through Agoda
- Cardinal Photo Products on Zazzle A fun selection of great gift products made from a few of our favorite images.
- David Tobie's Gallery Innovative & creative art from the guy who knows more about color than nearly anyone else
- Galleries Our favorite images
DPS 7-01: Infrared Adventures & Images, Lowepro Classified 250, NiMH Hybrids Pay off
Welcome to Volume 7 of DigitalPro Shooter, the Nikondigital.org newsletter. In our 8th year of publication we're as committed as ever to providing you with real world photo tips and news of interest to serious photographers--especially those using Nikon and Canon digital cameras. I'm quite excited today to be bringing you a follow up to the very popular article on Infrared photography I wrote for PC Magazine (you can find my previous Infrared article online). That article went through the basics of shooting digital infrared, but after spending a month in Southeast Asia with a converted D70 from LifePixel I have a lot more to share in terms of more advanced thoughts, tips and techniques for those who are serious about IR. I also road-tested the new Lowepro Classified 250AW and a set of new Eneloop hybrid rechargeable batteries so I'm happy to share my results with them as well.
Feature Photo Article: Adventures in Infrared
One of the best surprises during my recent trip to Asia was how much fun I had with my Infrared D70 and how many really cool images I captured. I knew when LifePixel did the conversion for me that I'd be able to do a lot more experimenting with IR but the flexibility of it and the variety of images I was able to capture really blew me away. Many of you have already read the article I did on Infrared in PC Magazine--if not it is online, but I learned so much more on this trip that I want to share with you so I'm writing this follow up with more advanced tips and techniques.
Celebrating Gray
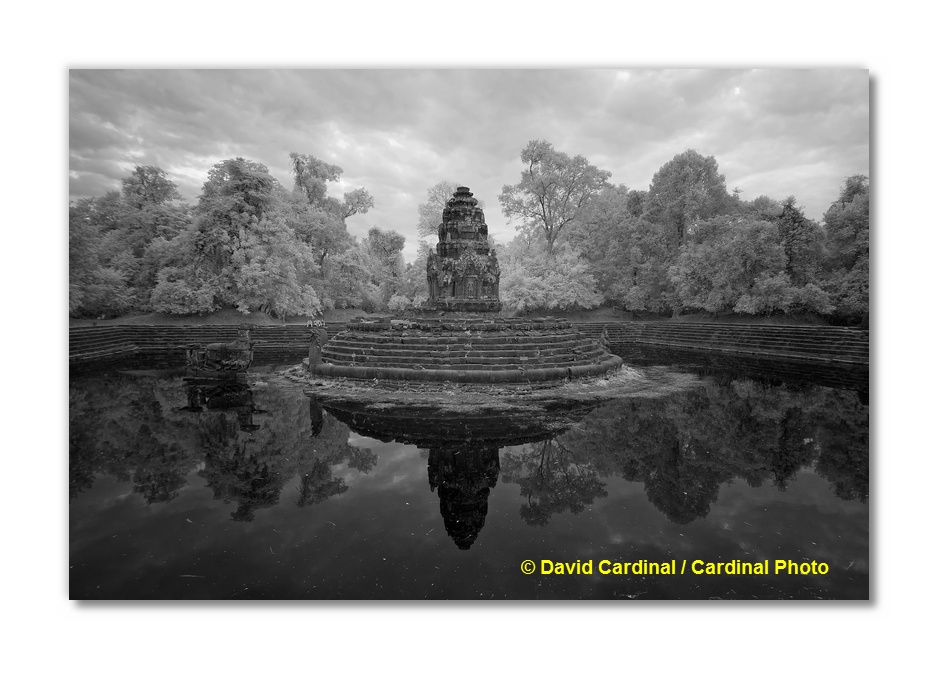
I can no longer count the hours I've spent over the years waiting for "color" to appear in the sky to help create a special image. Sometimes of course a gray sky can make a compelling black and white image to help salvage the shoot if color doesn't appear. But often all we get out of the most promising sunrise or sunset opportunity winds up being sort of a murky overcast gray.
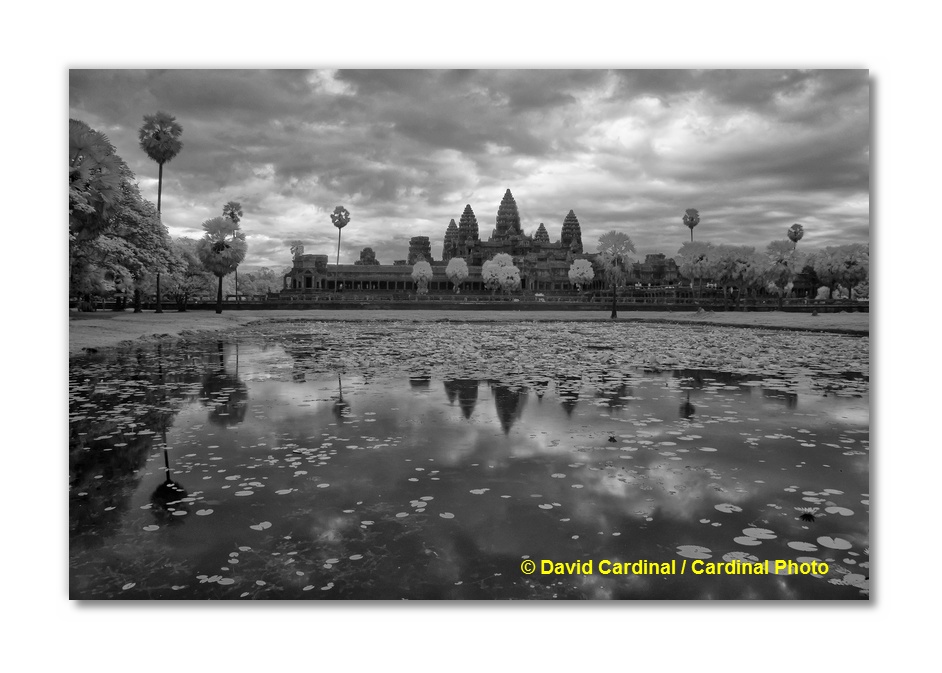
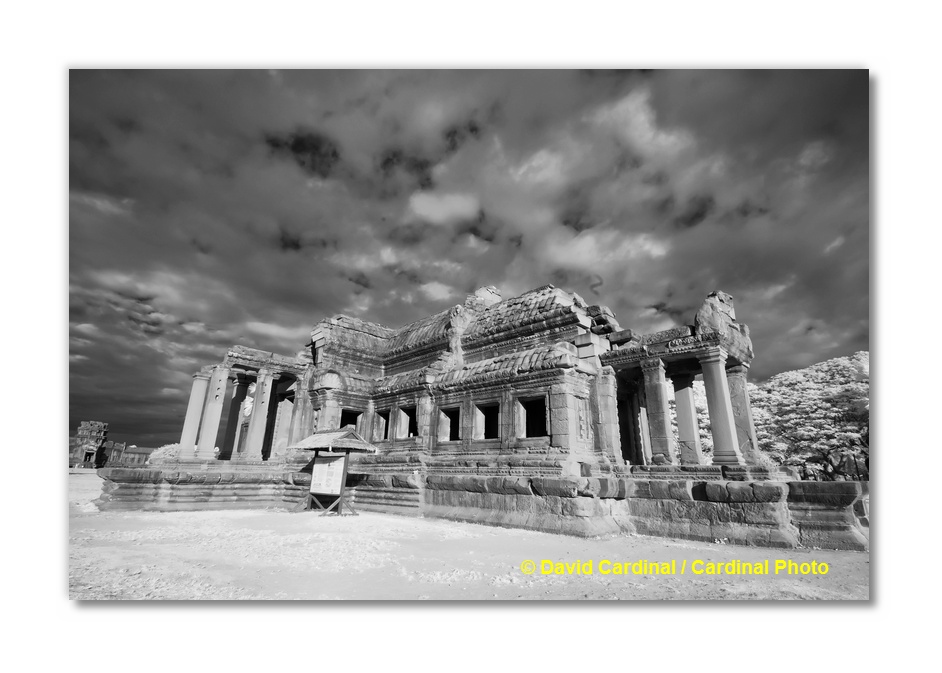
To my delight, in many cases these skies quickly turned into dramatic Infrared images. The above image of Angkor Wat showing its reflection in the nearby pool at sunrise is a great example of creating drama from a fairly plain, dull gray overcast sky. And below is the image I created by simply turning around and photographing one of the "libraries" at Angkor against the same sky but this time front-lit by the newly rising sun.
Creating Contrast
Of course the sky isn't the subject of most of our photos. These Angkor photo works not just because of the sky but because the foliage in the trees is immediately contrasted with the temple by recording the image in Infrared. Even though both the trees and the rocks are dark to the eye, the nearby trees are radiating plenty of light in the near Infrared spectrum--typical for most foliage--and giving us interest and contrast where we can't actually see any.
While I expected the increase in contrast between the temple structure and the surrounding grass and trees--one reason I made sure to bring my Infrared camera along for every hour of every day of our trip--I was pleasantly surprised that Infrared also helped created contrast between the stones and the lichen and moss that sprawled across it. This solves one of the most vexing issues with photographing the temples at Angkor--the angle of light. Many of the temples are hidden under large trees and have their own tall outer walls. As a result there are many scenes you can just not get nicely front lit to showcase the green of the lichen and moss against the gray stone. But even in full shade or partial light I found that Infrared spectrum provided quite a bit of texture and contrast when photographing any temple which had the slightest bit of growth on the stones.
Even in this situation it is critical to check your LCD as you go. While in some cases Infrared brought out tone that was otherwise invisible in other cases it would take black-looking stone and much brighter looking stone and destroy the contrast between them. So the lesson is not to trust your eyes. After awhile you'll get a sense of which scenes will look better photographed with Infrared but there are so many different variables that you're unlikely to know for certain.

Showcasing People
One of the biggest advantages of actually converting a camera to Infrared instead of just using a filter is that you can see, focus and meter through the viewfinder and capture action images. This image of some small children picking Hibiscus flowers outside a temple for sale in the local market is only possible because I had my D70 converted to Infrared by lifepixel.com, who do a wonderful job and are always available to answer questions. Do remember that once you've converted a camera you can't use it for regular photography.
The image takes advantage of the brilliant white of the flowers in Infrared to create contrast with the otherwise not very interesting color of the water. In a color version of the image you'd see the wonderful pink of the flowers but the water would be a murky gray as it was reflecting the cloudy sky.
To learn what didn't work and get some tips on how to make the most of infrared, read on...
[[[http://www.cardinalphoto.com/pages/events.htm height=2100]]]
Our World Views 2009 Cardinal Photo Calendars are now available for purchase on Zazzle.
What Doesn't Work
Not everything came up roses with Infrared. I was disappointed to find that shooting into the sun (whether a backlit sunrise or shooting the sunset) almost never worked. Any part of the image that was anywhere near the Sun lost all detail. Obviously even with a normal color camera exposing shots into the sun is tricky, but I could never find an appropriate exposure that created an interesting image. If you've got any tricks to share on this one please let us know in our photo forums on nikondigital.org.
Pushing the Envelope: High Dyanamic Range Infrared
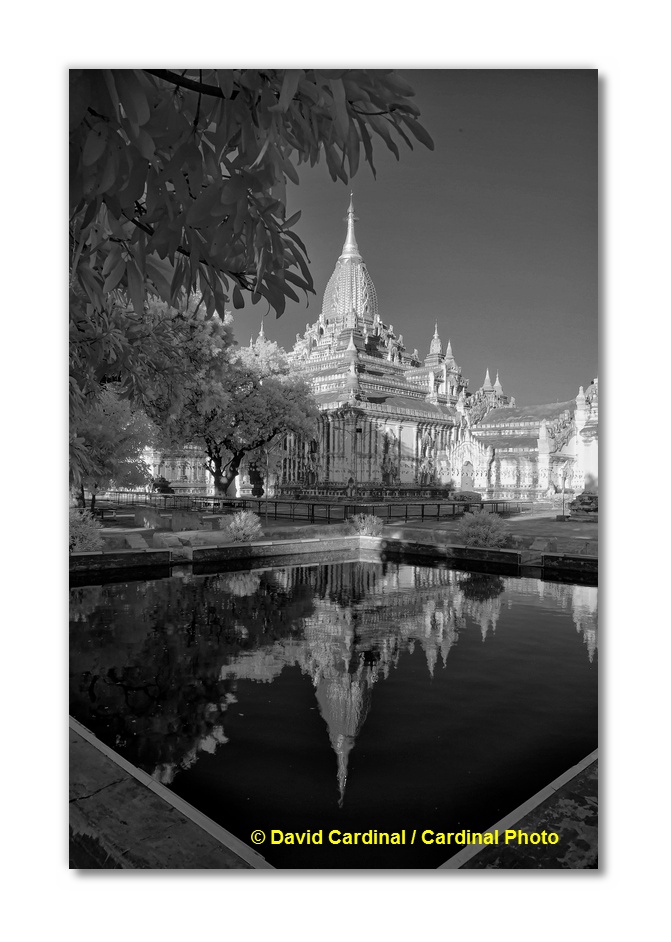
Since my other favorite new imaging tool is Photomatix Pro for assembling HDR images it was only a matter of time before I started working with HDR Infrared. The really good news is that it works just fine. Below is a scenic of Ananda Temple in Bagan, Burma (Myanmar) reflected into a small pool on the grounds. The bright sun on the white plaster of the temple made it impossible to capture the entire range of the image in a single image. And I really wanted to have the gorgeous texture of the foliage stand out--which I knew it wouldn't do with a traditional color or black and white image.
So I took a series of 5 IR images from +2 to -3 and simply dragged them all into Photomatix Pro. It quickly assembled them and did a reasonable tone mapping. As usual though I tweaked the White Point, Black Point, Temperature and Gamma to get the image that I wanted. I then ran my standard "IR Prep" action in Photoshop to apply noise filtering with Noise Ninja, Raw pre-sharpening with nik and then nik SilverEfex Pro with a preset I've built that works well for the IR images I take. The result, with less than two minutes of work is the below image:
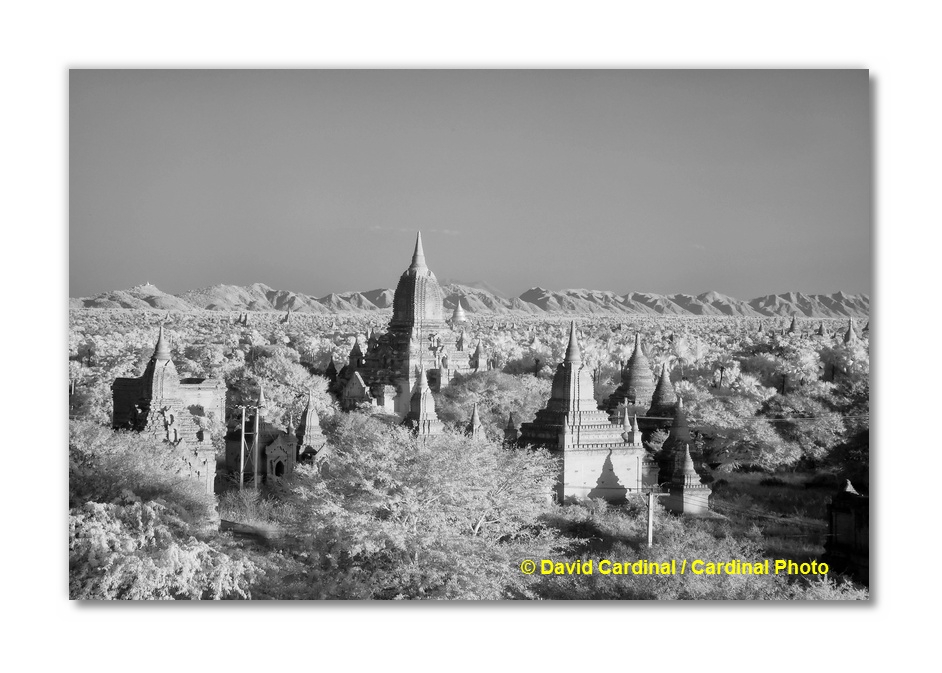
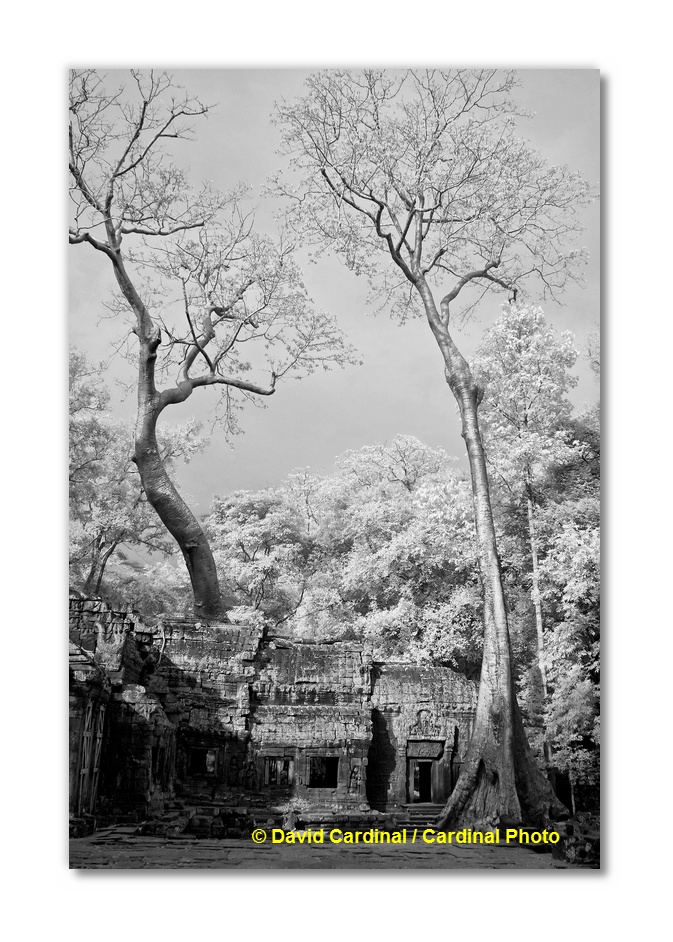
Seeing Anew: One of the highlights of shooting Infrared in a location like the temples at Angkor that I've been to many times is how it allows me to see the temples as if it was for the first time. Instead of risking boredom through repetition there is an opportunity to take a fresh look and "re-learn" the lighting, the tones and the textures of the temples and their grounds.
Focus Tips
Infrared light focuses differently than visible light. Your prime lenses likely have a small red mark on them to indicate a focusing adjustment for use with infrared film. Unfortunately it isn't that simple when using a typical zoom lens. To have your camera focus correctly you'll need to have it adjusted to focus infrared correctly with your most likely lens. Lifepixel will do this for you for many standard lenses or if you send your favorite lens along. In my case I figured I'd leave a simple 18-70 kit lens on my converted D70 so I had it adjusted for that. Fortunately the folks at lifepixel let me know that the 18-70 was very similar to the 18-200 so I could also use that to get a little more range.
But however you have your focus adjusted it is not going to be as precise as when shooting standard visible light so it is important to close your aperture down as much as you can to maximize your depth of focus. For that reason I really encourage using a tripod for shooting Infrared landscapes even with a converted camera.
Exposure Tips
Because your camera's meter was not designed to meter Infrared you'll need to pay special attention to the exposure you're getting by reviewing the histogram. This is another good reason to use a tripod when shooting IR, as you'll often need to try several different exposures of the same scene. I almost never needed to dial in more than a stop but often found that +1/3 was needed and less often that -1/3 or -2/3 was needed. If your camera has an RGB histogram you'll want to use it because IR uses colors very differently than we are used to. The RGB histogram lets you check the highlights in all three colors so you can make sure none of them are blowing out. If you don't have an RGB histogram (like my D70) then another trick you can use is to look at the color of your IR image in the LCD. Assuming your White Balance is set correctly (LifePixel set mine for me, otherwise you can tweak yours to make a green lawn look white) then an ideal exposure should be mostly gray tones. If you see cyan areas it often means they are over-exposed and have lost detail so you should try the shot again with minus dialed in for exposure.
Lesson Learned
When I first got the D70 converted I thought it was something of an extravagance to dedicate an entire camera to Infrared. But now that I've been using it for a couple months my only wish is that I'd converted an even better camera like a D200 so I could be taking higher resolution images and also taking advantage of the more powerful image review features of the D200--especially the RGB histogram found on the D200 and newer cameras which makes it much easier to see if your Infrared image is overexposed in one of the channels.
Converting your Camera for Infrared
If you're as excited by the possibilities of Infrared as I am you're probably looking around your studio already for an old camera body you can convert. If not, older used D-SLRs are inexpensive enough in the for sale forum on our site or on eBay that you may be able to experiment. Once you've got a camera you want to convert I strongly recommend LifePixel as a very service-oriented and professional company that does an excellent job and is happy to help answer any questions. They can do a traditional IR conversion, or a trendier "enhanced infrared" that lets more of the color through. They even offer to make your camera full spectrum (by completely removing the IR filter and replacing it with clear glass). That provides great flexibility but because you need to use a filter to shoot IR you can't use the viewfinder and autofocus. As I've mentioned I went for the most traditional conversion--standard IR with a 720nm cutoff--and have been very happy with it. If you use LifePixel make sure and let them know we sent you!
Cardinal Photo Safari Update
The best news for the many of you who have been asking is that we'll be returning to Africa in November, 2009 for another Botswana Wildlife Photo Safari. The Botswana trip is already half full, so if you want to join us now is the time to act! As those of you who have been with us before know, there is nowhere else in the world that compares to a small group specialized photo safari to the private concessions in Botswana. Not only is the wildlife abundant, but the camps are gorgeous. Most importantly there are strict limits on the number of people and vehicles in each concession--and for our photo safaris, a strict limit on the number of people per vehicle. Many days we may not see anyone except the handful of people from our group.The year 2009 will mark my 7th photo safari to the concessions in Botswana. Every trip we've seen not just plenty of lions, hippos, giraffes and antelopes but also cheetahs, leopards and wild dogs. Truly a special trip.
The Botswana, Texas and Alaska Grizzly Bear trips are filling up, but we have a few slots left so if you're interested please act soon by signing up or emailing us at safaris [at[ cardinalphoto.com. Thanks!--David
David's Favorite New Products
Lowepro Classified 250 AW
I really enjoyed using my new Lowepro Classified 250 AW in Asia. I wanted to bring a bag that could carry all the gear I'd normally put in my Computrekker but that I could shoot from while walking. Being a top loading bag (like the older Reporter series) the Classified fit the bill. The 250 version also features a laptop slot, something not found in the Reporter. Being a fairly ordinary looking black shoulder bag it didn't attract attention the way a fancier camera bag or back pack might have. The heavy flap was also a nice feature as I wiggled through small openings in temples and markets. It kept the gear inside from getting scratched.
As with any camera bag however, there are some caveats I found:
* If you load the bag the strap is going to get very heavy. It is not as wide or padded as a true backpack strap and of course there is only the one "shoulder" strap. I think the bag needs some type of "messenger" strap or something more comfortable for carrying a large load.
* Even with a good strap trying to carry and use the bag with both a full complement of photo gear and a laptop would be a chore. I tended to pack the bag two different ways. For air travel I put the laptop in it along with my 2 D-SLRs, my 18-200, my 12-24, SB-900 and filters. Of course I also threw in my headphones, mouse, external battery pack and travel documents. But I took out my 70-200 and Teleconverter, relegating those to my checked in Pelican roller. Once I arrived in a city I took the laptop out and stashed it in the safe in my hotel room or at least in a different bag and then put the 70-200, Teleconverter and any needed local information or guidebooks back into the Classified for local use.
* My laptop screen started to go bad during the trip, with the likely culprit being some type of impact damage to the internal wiring. Fortunately for me it "only" killed the right half of my screen so I could work well enough to file, but it did make me more cautious about the laptop slot in the Classified. I'm used to the very rugged protection offered by my Lowepro CompuTrekker Plus or the relative cocoon effect of the many layers of my Lowepro Stealth Backpack, so the lighter protection offered by an over the shoulder bag like the Classified took some getting used to. In no way am I blaming the bag for anything, but the problem did make me more aware of the differences between the different styles of bags, especially when fully loaded and then used in the relatively rough environment of getting shoved into small overhead airplane bins or beneath crowded seats. In standard "on location" use the lighter design of the shoulder bag is certainly a treat and there is plenty of padding.
In general I really liked the bag and look forward to using it as I cover PMA in a few weeks--probably with a Lowepro Deluxe Shoulder strap. You can get the Lowepro Classified 250 AW for $210 from Amazon: Lowepro Classified 250 AW Shoulder Bag (Black)
If you don't need the large size and laptop slot of the 250 the Classified 160 is only $150 and more convenient to use: Lowepro Classified 160 AW Shoulder Bag (Black)
Nikon SB-900 with new long life NiMH Rechargeables
As many forum members have reported from their own tests, both the exciting new Nikon SB-900 flash and the older SB-800 flash recycle dramatically faster when used with the new "Hybrid" NiMH rechargeables. These new batteries (known by brandnames like Everlast, Eneloop and Imedion) are rated for less total capacity (2000 mAH to 2200 mAH vs. 2600 mAH to 2800 mAH for traditional NiMH) but for high current drain devices like Speedlites they are actually much more effective. This, coupled with their main benefit of having their charge last in your bag for months instead of days without needing recharging make them a no brainer for most photographers. You can get 8 of the new AAs for only $25: Sanyo Eneloop 8 Pack AA NiMH Pre-Charged Rechargeable Batteries.
You can use your existing NiMH charger or you can get a kit which includes a charger: Sanyo Eneloop Power Pack with Battery Charger, 8 AA & 2 AAA Batteries Plus 4 C & 4 D Size Adapter
Filter Favorites
You've probably noticed I've become a big fan of the new nik Color Efex 3.0 filters. Many of them provide the same functionality I did with laborious use of Actions and hand-tweaked filters before but they do it quickly and simply. And some of the filters like the Glamour Glow are novel treatments that are new tools I've been able to add to my arsenal. B&H has the Color Efex Pro 3.0 filters for sale for $249. I also used nik's SilverEfx Pro to convert the Infrared images in this article to true Black and White. I even created my own preset which works really well (post on our forums if you want me to send you a copy).
DigitalPro 5 for Windows
Pro Shooters LLC, released DigitalPro™ 5 for Windows, a substantial upgrade to their award winning integrated image browser and image cataloging software. DigitalPro handles the entire image review and cataloging process, including loading, reviewing, renaming, captioning and filing images. With DigitalPro’s image catalog users can quickly retrieve images based on categories, keywords, captions or shooting data. For editing DigitalPro integrates seamlessly with Adobe Photoshop, Photoshop Elements, Nikon Capture and Capture NX, Bibble, or the user’s choice of photo editors. Fully Functional Trial and Upgrades avaiable for download now.
Recent Photography News from nikondigital.org
February 4: Alamy has released some great data on the Stock photo business in 2008. They had revenues of $31M from their image library of 15 million images (an average of $2/image). They paid out just over $20M of that in royalties to contributors. Out of their top 100 photographers, 69 had less than 10,000 images in the library and averaged $13 per image while 31 had more than 10,000 images and averaged $3 per image. Their top 100 photographers made from $26K in royalties to $285K in royalties.
February 3: Nikon & Casio unveil "time-traveling" cameras: The Nikon Coolpix P90 and the Casio EX-F1 and EX-FH20 all allow continuous captures of low resolution images (3MP or so), allowing you to go back and select an image from exactly when or even before you pressed the shutter! Nikon calls the feature Continuous Scene Mode while Casio uses the more technical but perhaps more obvious term Lag Correction. The Casios can also capture some amazing high speed video.
January 31: Nikon Releases a helpful guide to the Nikon D3 for Sports Photographers--Available as a free download from Nikon USA.
January 31: In another sign of the poor economy and its effect on Photographers myloupe.com told its contributors today that effective April 1 they were reducing their royalty rates to 60%. While 60% is certainly in line with traditional stock agencies it is another blow to the photographer-centric business model which had often featured rates up to 80%--this just shortly after the abrupt bankruptcy of Digital Railroad.
January 28: Nikon increasing prices on February 1: Nikon will be increasing prices on most of its photo products by 10% - 20% (in the USA and many other geographies) on February 1. Dealers will have some stock at the old prices so the effect may not be immediate, but if you have a camera or lens you've been considering, now is the time to jump on the deal or decide to hold off for awhile. If you use the B&H or Amazon search boxes on this site to purchase it'll help out the site.
January 26: Adobe adds Nikon D3X support to Photoshop and Lightroom. ACR (Camera Raw) 5.3 by making Release Candidates available for download. The release also includes support for the Olympus E-30 and a fix for Canon 5D Mark II files.
January 21: Firmware Updates available for Nikon D700 and Nikon D3 D-SLRs. D700 Windows version is here and Mac version is here. D3 Windows version is here and Mac version is here. D700 version 1.01 fixes an AF issue, black dots in long exposures and a couple minor issues. D3 version 2.01 improves AF on dark subjects, allows focus point selection after AF-On button is pressed and several other minor fixes.
If you have a hot tip or news item for DigitalPro Shooter, write us at dps@proshooters.com. If your tip or news item is picked as the Shooters' Tip of the Week, we'll send you a really cool DigitalPro hat! Or just write us to let us know what you think of the newsletter.
To keep up with the latest articles and reviews, join me at http://www.nikondigital.org. For the latest versions of DigitalPro, visit http://www.proshooters.com/dp.
Good shooting!
--David Cardinal, editor DigitalPro Shooter
nikondigital.org / Pro Shooters LLC
To Unsubscribe, please click here.
- Log in to post comments

Latest posts
-
Tue, Jun 14 2022
-
Fri, Jul 9 2021
-
Mon, Mar 1 2021
-
Tue, Mar 3 2020
-
Wed, Jan 15 2020
-
Mon, Nov 11 2019