- Photo Safaris
- Alaska Bears & Puffins World's best Alaskan Coastal Brown Bear photo experience. Small group size, idyllic location, deluxe lodging, and Puffins!
- Participant Guestbook & Testimonials Candid Feedback from our participants over the years from our photo safaris, tours and workshops. We don't think there is any better way to evaluate a possible trip or workshop than to find out what others thought.
- Custom Photo Tours, Safaris and Personal Instruction Over the years we've found that many of our clients & friends want to participate in one of our trips but the dates we've scheduled just don't work for them or they'd like a customized trip for their family or friends.
- Myanmar (Burma) Photo Tour Myanmar (Burma) Photo Tour December 2017 -- with Angkor Wat option
- Reviews Go hands-on
- Camera Reviews Hands-on with our favorite cameras
- Lens reviews Lenses tested
- Photo Accessories Reviews Reviews of useful Photo and Camera Accessories of interest to our readers
- Useful Tools & Gadgets Handy tools and gadgets we've found useful or essential in our work and want to share with you.
- What's In My Camera Bag The gear David Cardinal shoots with in the field and recommends, including bags and tools, and why
- Articles About photography
- Getting Started Some photography basics
- Travel photography lesson 1: Learning your camera Top skills you should learn before heading off on a trip
- Choosing a Colorspace Picking the right colorspace is essential for a proper workflow. We walk you through your options.
- Understanding Dynamic Range Understanding Dynamic Range
- Landscape Photography Tips from Yosemite Landscape Photography, It's All About Contrast
- Introduction to Shooting Raw Introduction to Raw Files and Raw Conversion by Dave Ryan
- Using Curves by Mike Russell Using Curves
- Copyright Registration Made Easy Copyright Registration Made Easy
- Guide to Image Resizing A Photographers' Guide to Image Resizing
- CCD Cleaning by Moose Peterson CCD Cleaning by Moose Peterson
- Profiling Your Printer Profiling Your Printer
- White Balance by Moose Peterson White Balance -- Are You RGB Savvy by Moose Peterson
- Photo Tips and Techniques Quick tips and pro tricks and techniques to rapidly improve your photography
- News Photo industry and related news and reviews from around the Internet, including from dpreview and CNET
- Getting Started Some photography basics
- Resources On the web
- My Camera Bag--What I Shoot With and Why The photo gear, travel equipment, clothing, bags and accessories that I shoot with and use and why.
- Datacolor Experts Blog Color gurus, including our own David Cardinal
- Amazon Affiliate Purchases made through this link help support our site and cost you absolutely nothing. Give it a try!
- Forums User to user
- Think Tank Photo Bags Intelligently designed photo bags that I love & rely on!
- Rent Lenses & Cameras Borrowlenses does a great job of providing timely services at a great price.
- Travel Insurance With the high cost of trips and possibility of medical issues abroad trip insurance is a must for peace of mind for overseas trips in particular.
- Moose Peterson's Site There isn't much that Moose doesn't know about nature and wildlife photography. You can't learn from anyone better.
- Journeys Unforgettable Africa Journeys Unforgettable -- Awesome African safari organizers. Let them know we sent you!
- Agoda International discounted hotel booking through Agoda
- Cardinal Photo Products on Zazzle A fun selection of great gift products made from a few of our favorite images.
- David Tobie's Gallery Innovative & creative art from the guy who knows more about color than nearly anyone else
- Galleries Our favorite images
Finishing a photo with Photoshop CS6’s Adaptive Wide Angle filter
Finishing a photo with Photoshop CS6’s Adaptive Wide Angle filter
Submitted by David Cardinal on Mon, 04/09/2012 - 17:25
 While not one of the marquee new features of Photoshop CS6, the Adaptive Wide Angle filter can help with one of the trickiest post-processing situations – correcting the distortion caused by using a wide angle lens. At the same time it can help reshape the image to draw attention to the subject in an image, which can be tricky if the subject isn’t the closest object to the camera….
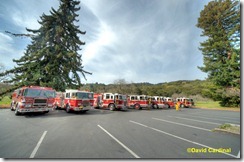
I got a chance to put the filter to work this week while photographing our county’s fire training exercises. Among other images on the client’s shot list was a wide banner they could use on their fund-raising website. At one point the fire crews had seven engines lined up ready to start in on a fire drill. The composition was ideal for a web banner, but my shooting options were somewhat limited. A strong sun from the left side meant I couldn’t move too far around to the front of the engines, and other vehicles and small trees in the parking lot meant I had to work fairly close to the engines. So I put my favorite ultra-wide, the Sigma 12-24mm lens, on my Nikon D700 (which being full frame gave me a true 12mm look at the scene – if I was purchasing today I’d get a Nikon D800 of course!) and then waited until there was a little action and snapped away.
Because of the bright side light I also used a set of three bracketed shots, each one exposure apart, to give me a good dynamic range. The semi-automatic ghost removal in Photomatix Pro made it easy to “freeze” the moving fireman and quickly render an HDR version of the image into Photoshop.
Once in Photoshop, the image didn’t need much work other than my standard noise removal and raw sharpening using Neat Image. I could also have used nik dFine and nik Sharpener Pro with the Raw sharpening preset. Or I could have used Adobe’s built-in tools in Lightroom or Photoshop, but personally I still prefer the third party versions. I also cropped the image into an aspect ratio suitable for a web banner.
After that I was ready to look at the image composition. You can see that the engine on the left, because it is both close and off-center, appears very wide and also somewhat slanted into the photo. I was hoping to fix both problems as quickly as possible. Before CS6 I would have needed to mess around with perspective correction to fix the “lean” of the engine, and then use some other type of heavy-duty editing command to try to reduce its width.
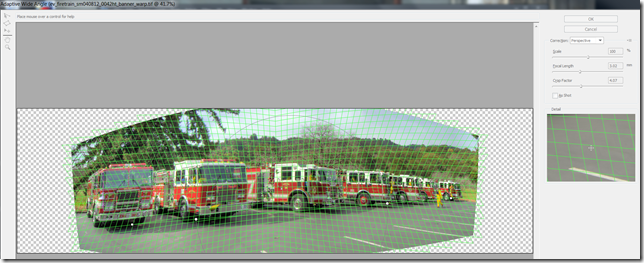
With CS6 I could do both with a single filter. I called up the Adaptive Wide Angle filter, setting the correction type to perspective – since I wasn’t shooting with a fisheye lens I didn’t need to use the fisheye correction – and the focal length to 12mm, the way I shot the scene. If I’d opened a single image I wouldn’t have had to set the focal length since Photoshop would have gotten it from the shooting data, but that detail got lost in the HDR conversion.
Setting the defaults is only the beginning of the fun in the Adaptive Wide Angle filter. You can add constraints which control how the image warping is performed. As with perspective correction, it is sometimes wise not to correct lines all the way back to some sort of ideal position, as that can make the result look unnatural. In this case I placed a vertical constraint (use the constraint line tool with the Shift key down to have it horizontal or vertical) forcing the front of the fire engine on the left almost to vertical. I then drew a “regular” constraint line underneath the fire engines, to line them up in a way more to my liking. Once you’ve placed a constraint you can move sections of it around using the supplied drag handles.
First I tried lining all the trucks up perfectly, but since the left engine was behind the others in the scene, it looked odd when I brought it alongside them. Instead I used a simple curve under the engines to pull the center engines further into the foreground, making them standout as as the primary subjects of the image. I also wanted to accentuate the size of the trucks so I used the Crop factor slider to enlarge the vehicles even further in the scene.
If you don’t like the way your image lines up, you can even rotate the constraints which will change the angle of your image. Additional tools allow you to specify entire polygons to correct – Photoshop will straighten out all of the edges of the polygon you draw at once.
The final image looks more like what the scene did to my eye. The trucks all appear the right size and the centermost trucks grab the lion’s share of the attention. Notice that the distortion correction left us with empty corners of the image. I of course crop these out before using the image, but left them here to remind you to frame loosely if you expect to use a filter like this one or the Perspective correction feature of the Crop tool so that you’ll have enough background useable in your image when you’re finished.
- Log in to post comments


