- Photo Safaris
- Alaska Bears & Puffins World's best Alaskan Coastal Brown Bear photo experience. Small group size, idyllic location, deluxe lodging, and Puffins!
- Participant Guestbook & Testimonials Candid Feedback from our participants over the years from our photo safaris, tours and workshops. We don't think there is any better way to evaluate a possible trip or workshop than to find out what others thought.
- Custom Photo Tours, Safaris and Personal Instruction Over the years we've found that many of our clients & friends want to participate in one of our trips but the dates we've scheduled just don't work for them or they'd like a customized trip for their family or friends.
- Myanmar (Burma) Photo Tour Myanmar (Burma) Photo Tour December 2017 -- with Angkor Wat option
- Reviews Go hands-on
- Camera Reviews Hands-on with our favorite cameras
- Lens reviews Lenses tested
- Photo Accessories Reviews Reviews of useful Photo and Camera Accessories of interest to our readers
- Useful Tools & Gadgets Handy tools and gadgets we've found useful or essential in our work and want to share with you.
- What's In My Camera Bag The gear David Cardinal shoots with in the field and recommends, including bags and tools, and why
- Articles About photography
- Getting Started Some photography basics
- Travel photography lesson 1: Learning your camera Top skills you should learn before heading off on a trip
- Choosing a Colorspace Picking the right colorspace is essential for a proper workflow. We walk you through your options.
- Understanding Dynamic Range Understanding Dynamic Range
- Landscape Photography Tips from Yosemite Landscape Photography, It's All About Contrast
- Introduction to Shooting Raw Introduction to Raw Files and Raw Conversion by Dave Ryan
- Using Curves by Mike Russell Using Curves
- Copyright Registration Made Easy Copyright Registration Made Easy
- Guide to Image Resizing A Photographers' Guide to Image Resizing
- CCD Cleaning by Moose Peterson CCD Cleaning by Moose Peterson
- Profiling Your Printer Profiling Your Printer
- White Balance by Moose Peterson White Balance -- Are You RGB Savvy by Moose Peterson
- Photo Tips and Techniques Quick tips and pro tricks and techniques to rapidly improve your photography
- News Photo industry and related news and reviews from around the Internet, including from dpreview and CNET
- Getting Started Some photography basics
- Resources On the web
- My Camera Bag--What I Shoot With and Why The photo gear, travel equipment, clothing, bags and accessories that I shoot with and use and why.
- Datacolor Experts Blog Color gurus, including our own David Cardinal
- Amazon Affiliate Purchases made through this link help support our site and cost you absolutely nothing. Give it a try!
- Forums User to user
- Think Tank Photo Bags Intelligently designed photo bags that I love & rely on!
- Rent Lenses & Cameras Borrowlenses does a great job of providing timely services at a great price.
- Travel Insurance With the high cost of trips and possibility of medical issues abroad trip insurance is a must for peace of mind for overseas trips in particular.
- Moose Peterson's Site There isn't much that Moose doesn't know about nature and wildlife photography. You can't learn from anyone better.
- Journeys Unforgettable Africa Journeys Unforgettable -- Awesome African safari organizers. Let them know we sent you!
- Agoda International discounted hotel booking through Agoda
- Cardinal Photo Products on Zazzle A fun selection of great gift products made from a few of our favorite images.
- David Tobie's Gallery Innovative & creative art from the guy who knows more about color than nearly anyone else
- Galleries Our favorite images
Using Iris Blur in Photoshop CS6 to direct attention
Using Iris Blur in Photoshop CS6 to direct attention
Submitted by David Cardinal on Wed, 04/25/2012 - 12:14
 One of the niftiest new filters in Photoshop’s bag of tricks is the Iris Blur filter. It mimics the behavior of limited depth of field by blurring the image outside a customizable “iris” shape. As usual, Photoshop provides plenty of options for controlling the radius of the non-blurred area (both an inner “hot spot” and outer "total effect” area), the shape of the iris, and the amount of focusing you want within the iris. Unlike using a wide-open aperture on your camera to blur the background, Photoshop doesn’t “know” which objects are close or far, so you need to craft the shape of the iris yourself. Fortunately Photoshop also lets you add multiple different iris blurs to create effects that would not be possible with a camera…
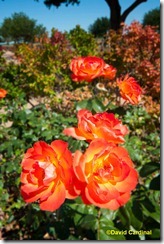
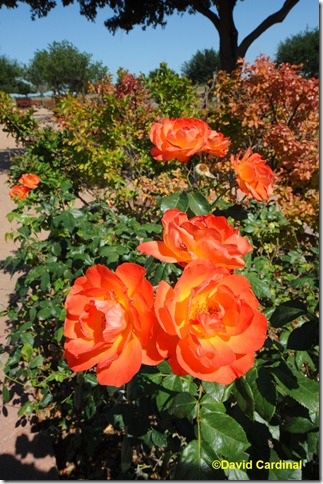
This image of some Orange Roses taken in the Texas Hill Country is a natural for Iris Blur. Since I wanted to have the roses all fairly sharp, I captured the image with a large depth of field – using f/22, which at 24mm full frame provides nearly infinite depth of field. Then I brought the original image (shown below) into Photoshop, using ProPhoto colorspace to help accommodate the saturated red and orange colors of the roses. The only adjustment I made in Camera Raw was a slight crop, maintaining the original 2:3 aspect ratio.
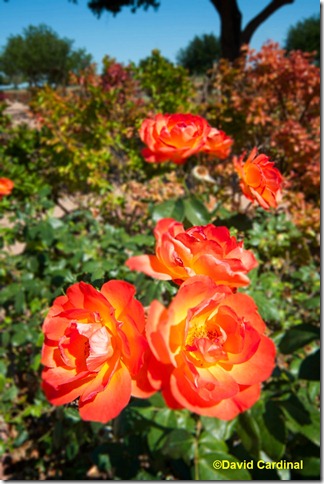
After a quick pass with nik’s Raw pre-sharpener, I created a new layer to use the Iris Blur (unfortunately the Iris Blur is “destructive” so you need to apply it to a separate layer if you want to be able to get your original image back). Then I simply brought up the Iris Blur filter and added a focus point on each of the roses. I left the closest roses focused at 100%, and de-focused the further away roses slightly.
As I added the focus points, I adjusted the “hot spot” (internal radius) to a size slightly smaller than the rose, and the outer radius to a size that kept the flower sharp but rendered the area around the flower with a pleasing blur. After adding the Iris Blurs, the only other enhancement I made to the image was a quick pass with the nik ColorEfex Lighten/Darken tool to darken the four corners of the image and further draw attention to the center. The final image is the one below:
- Log in to post comments


